AgilityFeat is notable for attracting clients who are looking into working with cutting-edge technologies, and thanks to that, recently, I’ve had the amazing opportunity to dive in head-first into researching about and experimenting with various BigData technologies, focusing mainly on Hadoop.
Hadoop is still at a very early adoption stage, which has proven to be not only challenging, but inspiring as well.
I’ve been able to contribute to the Ruby/Hadoop community by coming up with a SQL to HBase parser called HipsterSqlToHbase, and thanks to this and other similar projects I’ve worked on, my knowledge about data processing with Hadoop has been growing exponentially.
I could write volumes about Hadoop and the amazing toolset that has been evolving within its ecosystem, but to keep things concise, this post will be, in a sense, a continuation from my Introduction to Hadoop for Rubyists (in which I go into great depth of detail as to how quickly you can begin using Hadoop with Ruby working with nothing but HBase and Thrift).
In the next few lines I’ll share the intricacies of HBase data structures, show you how to insert and update simple and complex rows of data from Ruby into HBase (using Thrift) and finally how to harness the power of HBase’s Filtering Language to retrieve and bend data to your heart’s content.
How HBase structures its data
In my introductory post about Hadoop I mention how HBase saves all data directly to HDFS (as opposed to Hive, Pig, or Mahout which all generate MapReduce jobs which need to be processed before any data is stored and actually becomes retrievable). HBase is able to achieve this through it’s data structure which relies heavily on keeping every change to each row stored separately, and atomically:
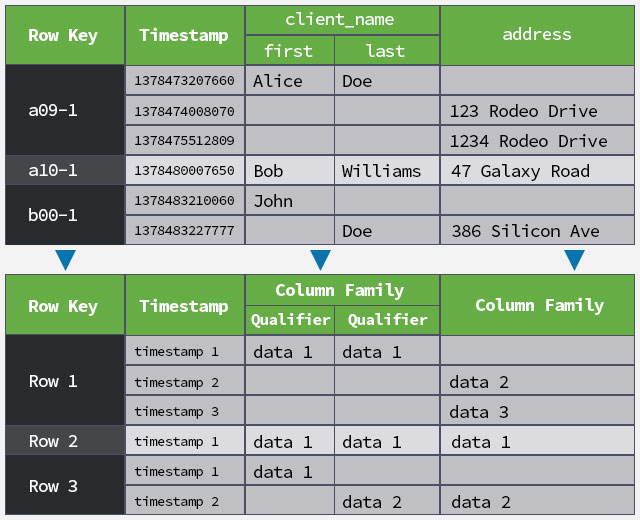
As you can tell by the previous chart, structurally speaking, every column in an HBase row is stored separately as a key-value pair. In this case the row id is responsible for linking the columns together, along with a timestamp. The reason a timestamp is added is so that you can store multiple versions of a row (up to 5 by default, although this setting is completely customizable).
To explain further about how HBase stores data in HDFS would be an overkill for this post, so I’d suggest if you want to delve deeper into the subject later on, to check out this slideshare by Enis Soztutar from Apache.
Mutating an HBase Table (Better than “Inserting” and “Updating” Rows)
Now that you manage a basic concept of how data is stored in HBase, let’s show you how to manipulate these datasets.
In my Introduction to Hadoop for Rubyists I had already outlined how to create a table and how to “insert” data into said table.
I am “air quoting” the word “insert” here, because in HBase you do not insert nor update.
In regular SQL databases, tables are structures which contain rows, and these rows are inserted (created), updated (edited), or deleted. Hbase tables, on the other hand, contain no rows; they are actually made up of atomic values which are linked, grouped together, and displayed as rows. Also, within HDFS, data is never “modified” (and I do mean never). Whenever you “modify” a value, this simply generates a new key-pair file within the table, which means that the original value which you’re modifying is never touched; it is only ignored from that point on (unless you specify otherwise). This is why any data manipulation within an HBase table is referred to as a mutation of said table.
Alright, enough chit chat, let’s get down to business.
If you haven’t already, download the test files used in my intro to HBase blog post by clicking here.
You’re going to be working mainly with the file named hbase-put-row.rb, focusing on the following lines of code:
This is the main structure of the code you will be using to mutate your database from here on. You might’ve noticed that the code in of itself is pretty simple, but it can get messy quickly once you start performing more complex mutations; especially if you’re not sure of what you’re doing.
So let’s break it down part by part.
The first line you’re interested in is:
All you’re doing here is defining a variable thrift_mutations which will be an array. It might be simple, but this is already telling us about Thrift’s capabilities for running more than one mutation on a single call. This feature is super useful, and it’s one of the cornerstones of the code I used to forge the HipsterSqlToHbase gem.
Let’s move on to the next line:
Now we’re talking. This is definitely an interesting piece of code. Here you’re running the new method from the HBase::Mutation class and passing it two named arguments. This will return an HBase::Mutation instance which you’ll push into our previously defined array.
Let’s talk a little more about the HBase::Mutation class.
By definition a mutation changes a table, but within this class’s code’s semantics, it focuses on allowing us to change column values. Hence the reason you’re passing it a column’s name and the value you want to place on this column.
Now that you’ve specified the value that you want to store, you need to tell HBase where to apply this change:
Again, the wording is somewhat misleading since you’re running a method called mutateRow to apply our change. This method accepts four arguments: the name of the table you’re mutating, the id of the row that you are going to be adding the data into, an array of valid HBase::Mutation instances, and finally a hash which can contain extra options.
I do feel the need to be emphatic about this issue, again. You are NOTgoing to be mutating, creating nor modifying the row. Once you run the previous line of code, within HDFS, inside a folder assigned to the table data by HBase, a file will be generated which contains nothing more than the column name and the value it has been assigned, and the file itself will be named using the row id and a timestamp.
And, just to go a little further into this matter, once you run this code, If you take note of the UUID that was used as the row id and replace the SecureRandom.uuid portion of the code with it, the next time you run the code you will be performing an “update” instead of an “insert”, except it won’t truly be an “update” since a new file will still be generated to store the “modified” data and the previous file will simply be ignored. Both of these files will have the same row id, but a different timestamp.
Now let’s make this code a little more real world friendly.
Let us assume you’ve got a table for storing users and their info (the table columns would be ‘user_name’, ‘full_name’, and ‘password’), and you want to be able to save multiple users at a time.
Again, let’s look at what you’ve done here step by step:
Simple enough, you’re setting an user array named new_users, where each user is depicted as a hash containing a user name, the respective user’s full name, and finally their password.
Now, a common mistake when iterating over data sets in order to create thrift mutations is to place all mutations under the thrift_mutations array. This is a big no no, since once you run the mutateRow method, you are going to perform all mutations (all 3 in this case) while pointing them to a single row, and for your current purposes you would end up with a single row containing John Doe’s user as opposed to 3 rows containing Alice, Bob and John.
To avoid this, on the previous code, you instantiate an user_row_mutations array. And right after that you simply iterate over the new_users array appending the mutations for each user column onto the thrift_mutations array. And finally you append the thrift_mutations onto the user_row_mutations. Quite a mouth-full, right? Yet not complex at all.
To top it all off, you will simply iterate over each of the user_row_mutations‘ arrays and execute mutateRow for each of them. This would be the SQL equivalent of sending three separate INSERT sentences over to the database.
Using HBase Filters to Get What You Need
If you’ve made it this far, you’re a champ. We’re nearing the end of this quick and painless tutorial so don’t go anywhere just yet.
Ok, you now have a data set. Wonderful!
“How do I retrieve my data now?”, you ask? Simple. Using the HBase Filter Language.
HBase Filters allow you to ask HBase for data, given certain restrictions provided within the filters themselves. They are simple and you can group them together to perform complex data retrieval.
As of writing this article, HBase’s Filter Language is very scarcely documented with many syntactic errors found on the documentation provided by Apache. Even so, the filters themselves are actually very functional and so far I haven’t encountered any bugs using them. So I’ll do my best to describe thoroughly the ones I’ll be showing you here, and soon I’ll do a post dedicated solely to HBase Filters.
First thing you’ll need to learn about HBase Filters is their syntax. HBase Filters look a lot like functions to which you pass arguments to. Most filters will more or less follow this syntax:
Part by part, FilterName is obviously the name of the filter you are going to use (in this post I’ll be showing you the ValueFilter and the DependentColumnFilter), the condition will be a conditional operator such as (but not limited to) = or !=, and the ‘comparator:value’ pair should be looked at as two pieces of the puzzle where the comparator will be determining how the value will be affected by the condition.
There are several comparators. In this post we’ll be looking at the binary and the regexstring comparators.
Let’s put these concepts together with an example of the ValueFilter.
The ValueFilter is basically the SQL equivalent of the WHERE and the LIKE clauses merged together.
Taking into account the ‘user_table’ data set, let’s say you want to retrieve the user named ‘John Doe’. First you must lookup the value ‘John Doe’. Using the ValueFilter it would look like the following:
Quite easy, right? All you’re doing here is telling the ValueFilter to grab the columns’ values and return a binary result of either true or false as to whether the value matches ‘John Doe’. If The binary result is true, the matching row will be served.
Now, you might be wondering “how come we’re not mentioning what column we want the ValueFilter to be run against anywhere on the previous code?”, and that my dear Watson, is a very astute inquiry!
HBase Filters, by nature, can be grouped together by AND and OR operators very much like you can send various WHERE and LIKE clauses grouped together in SQL by saying something like “WHERE a=’b’ AND x LIKE ‘%z’ OR… etc”. So, in order to filter out only the rows which contain the value ‘John Doe’ inside the column named ‘full_name’ you will be grouping the ValueFilter you just wrote with the following DependentColumnFilter:
All you’re saying here is “give me all rows which contain the column ‘full_name’“. I should note that the second argument you see there, to which you are passing an empty string to, is meant for a column qualifier, but for now you’re solid just by providing the column name.
Now let’s group your filters and see what we come up with:
Before detailing what you’re doing here with the filters let me explain that the order in which you place your filters will indeed affect your end result so be very careful with that.
By placing the filters the way you just did there, you are saying: “Fetch all rows that contain a value ‘John Doe’ in any of their columns, AND after that take those resulting rows and bring forth only those who have a column named ‘full_name’ which contains the value”.
With all of the above you should now have a pretty useful understanding of how the HBase Filter Language works. Let’s put this knowledge to practice.
From the example files bring up the file named hbase-get-row.rb and replace on the following line the filter string with the filter you just wrote:
It should now look like this:
The arguments you are passing to the get method are the table name (‘user_table’), an array specifying what columns should be included in the final result array (‘*’ means all columns), the filters to run when retrieving the rows, and one optional hash meant for other advanced options you shall not worry about today.
If you run this ruby script now you should be able to see John Doe’s information in all its glory.
You have just created a request which would equate to saying in SQL “SELECT * FROM user_table WHERE full_name=’John Doe'”. But this might not be useful for long once you need to do more complex comparisons using wildcards similar to when you would normally use LIKE in SQL. And that’s where the <b>regexstring</b> comparator comes into play.
Let’s say that you wanted all users whose full name would include the string ‘Will’ somewhere in it. In SQL you would normally say “SELECT * FROM user_table WHERE full_name LIKE ‘%Will%'”, but what you want to write to get the same result from HBase will be:
Short and simple. All you did there was exchange the ‘binary:John Doe’ portion of your ValueFilter with ‘regexstring:.*Will.*’ et voilá, for your intents and purposes you should’ve gotten back the user information for Bob Williams.
This concludes this HBase tutorial. I wish I could refer you to more information about HBase mutations and filters, but as I mentioned before documentation on these subjects is still scarce. In the mean-time I’ll continue churning out more tutorials and articles on the subjects.
Until next time, Happy Hadoop’ing.